Any and all content of this site or any site owned by me, (Jody Wakefield) that is shared via the Web, Facebook, Twitter, or Pinterest must be accompanied by a link to the original site from which it was shared.


Sunday, February 24, 2013

Henrietta Hen Part 5

Hello! this is the last tutorial for this hen, I hope you have enjoyed watching her come to life. Her pattern is now available as well! I am definitely ready to start on another project.

NOTE: I added more descriptive photos of the wire feet being made. This was added to part 1 if you want to go back and check that out.


I am going to prepare the feathers. I always have my coffee mixture made up and ready to use. The feathers I have used are the boas you buy in the craft store. Of course this stark white will not cut it, this is a prim hen after all. lay the feathers on a foam plate and saturate them with coffee, use your brush to get the coffee everywhere.

Here are the feathers all wet and looking pretty bad. Let them dry and fluff them a bit with your fingers as they dry.

I have glued the feathers on the neck and one leg in this picture, I love how this looks. You can see the comparison of how plain the other leg looks without them. I used fabri-tac glue here and held the feathers in place with straight pins until dry then pulled them out.

Adding little bits of feathers randomly around the comb adds even more whimsy. I finished her off by adding small strips of feathers on top of each wing. Does she look a bit put out and bored here? She is so done already with me messing with her!! LOL

She needs some eggs for her bucket. I covered small foam balls with clay, shaped them and let them dry. Once dry they are sanded, sealed and painted with acrylics.

Here are my painted eggs. I mixed them up by making some darker and some lighter. I speckled the eggs in the same way I did the chicken. 

I am checking to see if this is the look I am after, I do like it! I glue each egg in place. The eggs are sitting on top of foam that is topped with moss. Next I will make the sign.

for the sign I am using a thin wood tag from the craft store. I simply cut off the end with the hole. I then took a candy apple stick and glued it to the back. After it is dry it will need to be sanded.

I painted the sign in the same red I used for the hen's comb. Darker colors take 3 or so coats for good coverage.

To make the sign more interesting I added a float of burnt umber around the outside edges of this sign. I also printed the words on some card stock and cut it out a bit smaller than the sign. Next I will age the card stock with vintage photo distressing ink and a make up sponge.


Lay the sign on some paper so your table won't get inked. sponge the outside edges like you see here. I use a swirling motion. Just practice a bit on a scrap piece of paper to get the feel of it.

Next you are going to mod podge the card stock onto your painted sign. I wanted to show you the nifty container I found at hobby lobby. There are times when I need thinned down mod podge, I like to use a container like this with pre-mixed mod podge. The hole is large which I love, I can just grab and use it. For this sign however you will use it straight from the bottle without thinning it.

Here is the wet sign, you can see the mod podge but don't worry it will disappear when it dries. I applied two coats. 

Here's the bucket all finished. I do think it is looking nicely prim. 

Well that's it! I do hope you have enjoyed these tutorials. My hope is that the visuals will be helpful to those building their own hen's. Happy Creating!!!

Friday, February 22, 2013

Henrietta Hen tutorial Part 4

Hello! well here we are on part 4 of this tutorial. I bet you wonder if this is ever going to end? The answer is yes but it is much longer than I thought it would be. There will be one more post after this.
 
 
Here you see that I have added a float of white in each eye walking it up futher into the eye. I also added some white highlight dots and a reflection line. 


She now has eyebrows, eyelashes and a float of burn umber around the upper eye area to make them pop. I added a float of white under each eye. I swirled on some cheek color with a dry brush like you see in the picture. She is relieved to have a face now!
 
 
I added a line of burnt umber with a liner brush between the feathers. I finished that off with a float of burnt umber as well.
 
 
I added some shading around the upper thigh where the leg meets the body. It isn't showing up too well I see in this picture.
 
 
I added a coating of antiquing gel to the feet and wiped it back lightly with a piece of t-shirt material.
 
 
Here is a picture of the antiquing gel I use, the sealer I spray the finished chicken with and the mod podge I use as a final cover to the wire chicken feet.
 
I decided at this point that I wanted to have a speckled chicken. This can be done with a spatter tool like you see in the picture or a toothbrush. The paint needs to be thinned down a bit with water first. With my tool I coat the brush in paint and there is a metal piece you don't see in the picture that when I twist the wood handle it goes against the bristles. Just use a knife of paint spatula like you see in the picture and a toothbrush if you do not own a tool like this one.
 
 
It appears that I have thrown this chicken in the garbage can...... well yes I have actually! I stuck her in there so when I speckle her all up the floor and me does not get speckled with her.
 
Can you see all her speckles? I did this with Burnt Umber. What would I do without that color? I am not sure....
 
Here is the sideview, you can see all her speckles a bit better in this picture. I know all these details are a lot of fussing, but it is this kind of attention to detail that really does make a difference in your finished artwork!
 
This is the end of Part 4. Part 5 will focus on finishing her up and making her bucket of eggs! I also took more photos while I made another pair of wire feet. This time I show the steps of bending the wire into the foot shape. I will add this onto the last tutorial.
 
Thanks for stopping by!

Wednesday, February 20, 2013

Henrietta Hen tutorial Part 3

This is part 3 of the making and painting of my latest project Henrietta Hen. For those of you who are just seeing this, you can find part 1 and 2 under my painting tutorial links. NOTE: I started another chicken today, I documented the working with clay a bit more in depth. I have added pictures of this new chicken and the clay work to part 1 if you want to check it out!


Here are my colors all ready for basecoating my chicken. I will do all the entire body, head, wings and upper legs. My sea sponge has been dipped in water and wrung out, it needs to be damp.

 
I am in the process here of covering the fabric with my colors, see how they show slight tone variations and look a bit marbled? Notice as well I am wearing gloves for this messy job! She sits on a paper plate so my table won't get too much paint.
 
And here she is completely covered with paint that I have sponged on. During this painting session I had to keep adding more paint to my sponge as worked.
 
And a nice pair of chicken wings all painted up as well. You can see by the plate how much it is needed to contain the mess. A word about wings here, I do not own actual chickens so in my ingnorant bliss I ended up putting these wings on my chicken backwards! My sweet friend brought this to my attention. She said that the long edge was supposed to be in the front with the short ones to the back. SIGH..... too late, henrietta is just going to have to be (special) her wings are glued on by the time I find this out!
 
These toothpicks work so nifty for holding my beak and comb while they are being painted and are drying! Honestly, what would I do without foam plates either, do you see how much I use them?
 
I have positioned my painted clay pieces where I want them, lightly marked where they go with a pencil. I coated the comb with some fabri-tac glue and glued it on. For the beak I glued it on with a toothpick glued in the beak so it would have more stability being such a small piece. See, I am not realizing here that the wings should be flipped the other way...:-(
 
I am ready to hot glue her wings into place
 
I have just added a float of burnt umber around the beak and where the comb meets the fabric. I added some burnt umber in the nose hole and added a line of burnt umber between the upper and lower beak. I let this dry and decide it isn't enough and do it again.
 
This sideview shows that I floated some burnt umber on the lower section of the comb itself, you can see how it is darker there. All this shadowing is important, it is the difference between your piece looking stark and boring or having depth.
 
Oh oh!!! I knew I was forgetting something, this hen needs a wattle. Excuse me while I take a 30 minute break to draw one out, sew it and paint it....
 
Okay I am back! I made the wattle out of sewn fabric that I lightly stuffed, then painted on both sides. I am sure you are wondering what kind of torture this poor chicken is enduring.... I have glued the wattle to the head and am holding it in place with straight pins until it dries! No wonder my artwork would much rather live with someone else after all my abuse!
 
Oh my and yet more abuse to this little hen.... I found the button I liked the size of and am using it to draw in some eyes.
 
Next I will paint the eyes, eyelashes and other details. This handy dandy magnifying- tool below helps me see my things close up so I do a neat job!
 
Here she is with her eyes filled in with black. Next we will be adding more detail to this little chicken.

 
This will be the end of part 3. Part 4 will be on there very soon! I worked hard on the actual pattern today and that will be released soon as well. These things take time....
 
NOTE: don't forget to check out part 1 again for my added photos and adding the clay!
 

Tuesday, February 19, 2013

My latest winnings!

Well I guess I am on a roll here, I should hurry up  and sign up for more blog giveaways before my luck runs out! I have some show and tell, I won these sweet hand painted heart magnets from a giveaway that Barb from Barb's Heartstrokes was having! They really are adorable! Her painted things are lovely... check them out at www.barbsheartstrokes.blogspot.com . Thanks again Barb!!!

Saturday, February 16, 2013

Henrietta Hen Tutorial Part 2

Hello fellow bloggers.... I hope you are all having a wonderful Saturday! This will be my second installment on the making of Henrietta Hen. If you haven't seen part 1, I will have it in my tutorial line up. Click on the link under Fun Stuff on the right hand sidebar.

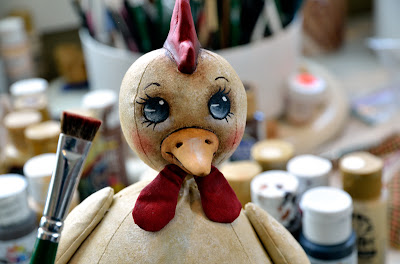
I know this picture is going way ahead of things as far as this tutorial, but I could not resist putting at least part of her here for you to see. Okay, lets continue on with building this Chicken.

I wanted to give you a peek in the last section at the clay I use and my work space, but I will start with it here. As you can see I work on glass, that way the dust can be cleaned away and the work space can be cleaned up nicely as well. I keep my open clay in a container with a damp paper towel and in a zip lock when I am not using it. This keeps it moist for next sculpting session. You can see my bin of sculpting tools and several on my table. The best tool of all is your fingers for smoothing!

Here it has been about a day, the clay is pretty hard but I know that the clay inside is still damp. I took my fingers and pushed in around the comb and beak to release the sculpted pieces away from the fabric. I gently pulled them off to finish drying.
I removed the head for painting. This picture shows how I have a dowel inserted into the head and tied off. I will sand any extra clay off the head now. As you can see here, there are holes in the beak and comb. I took toothpicks and drilled holes, this will be great for a way to paint them without touching the pieces. 

I am letting the beak and comb finish drying. In the meantime I need to draw up the wings. I do this by taking the actual body pattern and laying a piece of tracing paper on top. I can see how big it needs to be this way. I know none of you will have to do this part, I thought I would throw this in so you can see a bit of how this is done. This isn't the actual wing I used, I found that this wing was too short, so I lengthened it.

 They are dry now so sanding and cleaning up is in order. This clay is great, you can always take a knife and cut off and sand down what you want to change, or add to it even if it is dry. I realized that I ended up sculpting the beak of a duck instead of a chicken! I cut her nose off more to a point and liked it much better. Once your dry clay is how you like it, paint on a coat of gesso to seal the pieces and then they will be ready for paint.

Here you see the benefit of using toothpicks to hold your clay while painting and for drying. 

Reds are so hard to decide upon since there are so many variations. This is a great idea if you are needing to choose the perfect red, green or whatever color it may be. I took a foam plate and painted a sampler of all the reds I thought may work for Henrietta's comb. I wrote what they were beside each one. Once dry that gave me a true idea of what these colors looked like. They always dry darker than they come out of the bottle. I chose Tompte Red!


I chose three colors of creams for the body. I do not like the look of brushstrokes on pieces like this so for me sponging them on is the way to go. Sea sponges can be purchased in any craft store. There is no substitute, grocery store cleaning sponges will not do the same thing at all and do not work. 


I can tell that I will like the combination I chose by testing it out on a foam plate first. I am now ready to start painting my sweet little chicken! This ends part 2 Stay tuned for part 3 which will be the actual painting and finishing of Henrietta!

LinkWithin

Related Posts Plugin for WordPress, Blogger...