Any and all content of this site or any site owned by me, (Jody Wakefield) that is shared via the Web, Facebook, Twitter, or Pinterest must be accompanied by a link to the original site from which it was shared.


Sunday, January 5, 2020

Happy New Year!

Hello fellow creators and customers. It has been over 4 long years since I have posted anything here! I am not sure who even looks at blogs anymore? I guess this will be a test post.

I am returning to creating after two moves, a long divorce and a remarriage. When my life fell apart I had to abandon my creativity.  I am so happy to report that I am returning to pattern design and will eventually offer handmade items for sale. I no longer have my website but I still have my etsy shop and facebook page. I am happier now than ever!

 https://www.etsy.com/shop/jodywakefieldstudio/
https://www/jodywakefieldstudio.facebook.com

I decided to change my business name, although the nature of what I did has not changed. The decision came easy since the old name represented my old life and a different time for me. This for me is about new beginnings and getting back to my love for creating and designing patterns.I have recently completed a new pattern and have one more almost done. I will post the newest for sale in the coming week.

Here is the latest and is ready now in my Etsy shop. They stand about 16" tall. One having stump legs and the other solid bottom.


Here is the current pattern i am working on. It will be called Joyful heart. These two stand about 17" tall and have a sweet (heart) theme. This will go well for winter valentine time. They were fun to make! I offer detailed instructions on making everything you see here including my recipe for cinnamon heart buttons!

Well we will see what happens with this blog. Perhaps facebook and other social media venues are more popular now! I thought I would revive the page just to see.... I look forward to reconnecting with my fellow artists and customers.

Blessings
Jody Wakefield

Tuesday, September 30, 2014

Latest Happenings...

Greetings... Happy Fall!

I see it is time to get on here and post about what's new! Summer is gone but I am left with so many lovely memories from it. I had a great summer full of mini trips, friend and family visits and much more! I love Fall but am reluctantly telling summer goodbye.


I want to share my newly finished Prim Gingerbread, I used the pattern for the little ginger in my new Winter Thyme pin cushion pattern for this one and added it to this rusty bucket! This shows yet another way you can use the pattern. She fit so nicely in this bucket I went with it. The size of this ginger would lend itself to many kinds of containers, it just takes a bit of imagination. 

The bucket is 3 1/2 inches high by 5 inches in diameter. Using the instructions from that pattern, make up your ginger and apply her baked finish. Glue her into any rusty container she will fit in. I glued cinnamon stick pieces around her body and glued a cinnamon stick and pip berries in her hands. Her buttons are Allspice. She has chenille stems for arms that have a coating applied for added stiffness. As you can see I also changed up the frosting a little bit on this one! 

The darling graphic I used came from Deena Davis of Ewe N Me Printables. Deena has so many fun things on her site, check her things out! www.ewenmeprintables.com I printed the graphic, cut it out and applied with mod podge. Once that is dry add another coat or two of mod podge over the top with a brush and some slightly thinned down matte mod podge. Outline the sign with more mod podge and sprinkle fine glass glitter on before it dries. I sugared/glittered the whole thing in fine glass glitter. This little guy is now for sale in my Etsy store for any who may be interested. This will most likely be a one only, I just cannot make myself do more than one of pretty much anything! LOL


This is my latest pattern... a darling scarecrow that holds an LED battery operated candle. I am calling this the Let Your Light Shine Series because I plan on making other types down the road. I am planning on a snowman and ginger for sure. The problem always seems to be time with me and getting enough of it to do what I see in my mind to do! He uses my 4 inch LED taper candles! He is pretty easy to do as well. He is for sale on all my selling sites. I am including in the pattern a full sheet of tags with different fall saying for you to choose to use with him.


Here is a fun project I just finished! This is now for sale on my Etsy page. This One-Of-A-Kind LED taper holder was made by me using a recycled oil bottle. This bottle is filled with candy cane chenille stems, snowflakes, snowballs, mica, glass glitter and irridescent shards! The bottle has such a nice frosty look , you really cannot see that in the picture. I added German glass glitter to the outside of the glass on the upper and lower portions. There is ribbon and loopy fabric at the top that I also generously added glass to! The candle is covered in German glass and removable. I really think this turned out with such a neat look. Take a look at your next empty bottle, perhaps you will see a project instead of throwing it away!


 I want to say that the little rusty pans I am using in my ginger and snowman pin cushion pattern I cannot get right now. I am very sorry to say that my supplier is out so I am unable to order at this time. I will however have them again and will stock up when I have the chance.

I also want to let all who were following my things on PFATT Marketplace that I am no longer on that selling page. Loved being a part of it but for now I will sell my things on my own. When I do add hand made items I will use my newsletter, Facebook, blog etc.. to announce it.

In other news I want to share that my work will be published for the third time In Prims!!! It is such an honor to be a part of such a wonderful publication. My lady bug and bee dolls will be featured in the January issue.

That is all I know for now! Thanks for stopping by

Thursday, August 21, 2014

New Gingerbread and Snowman Pattern!

Happy August although almost over with, phew where is the time going for heaven sakes! I have another new pattern I want to share with you all.

I call this one Winter Thyme Pin Cushions featuring a primitive gingerbread and snowman. They were so much fun to make! These sweet holiday cuties can be made in a rusty pan or made to stand along as shown. I will try to keep stock of the candle pan in my Etsy and Web site.

These are cute simply made without the bases if that is your choice. Make them stand on an upside down rusty standard canning jar lid, perhaps put them in a rusty bucket and fill the bucket up with pip berries, sweet annie, cinnamon sticks add a led candle. Add a hanger and make large ornaments with them... just a few ideas!


This pattern can be purchased on my website, Etsy store or pattern mart!

Stay tuned for more patterns! I have several ideas swimming around in my head that are wanting out! I am excited about my next one. I am working on fitting time in for designing all while planning summer activities. I have one more in September to see family.... looking forward to that!

Thanks for stopping by and have a happy day!

Wednesday, July 30, 2014

New Pattern! Primitive Pin Cushion, Cat & Pumpkin

I hope your summer is going well! I have been blessed with visits from family and friends, not to mention several mini trips with the hubby! For those of you watching for new items I know I have really been taking a long break this time! I decided that I am going to enjoy the sun and going's on as much as I can.

Don't know about you all but we have had temps in the upper 90's to over 100 a lot lately, so we are stuck inside on those day. Thanks heavens for air-conditioning.

Well I wanted to pop in here so at least those who check in here will know I am still around and yes I have been creating a bit. I did just finish a new pattern today! They are two little 10" pin-keeps, a cat and a pumpkin. I just love them! The pattern can also be made without the tummy piece for more of an everyday project. They use wide mouth rusty lids, a 65 mm pumpkin bell and a 4" grungy taper candle in black! All these things currently can be purchased on my website. Here they are.... they can be found on all my selling pages. The finished pieces will be for sale on my pfatt marketplace page on August. 10th.


I have more patterns swimming around in my head, I just need the time now to bring them into reality! Thanks for stopping by!

Friday, May 16, 2014

Checking in..

Well it has been a slow start to summer around here, sun is wanting to shine finally. The morning frost has finally only just now left us, I have not planted flowers yet because of it, I will soon though.

If it seems as though any artsy activity has stopped around here it is because it has. For quite some time now I have been having a dry spell with my creativity, why? I have no idea, it just came upon me and has not yet left. I am not panicking too much since I know this can be a pattern for most creative types. I have had this happen before and know it mostly likely will come back as fast as it left.

 For no reason at all I cannot sit down for any length of time to create, I end up walking out of my room in frustration. The ideas are not flowing, I simply have none, now if any of you can relate to that one, well it is sooooooo completely frustrating. My mind at the moment is blank, I try but the more I force it the worse off it is. I will have to wait patiently for the ideas for new patterns to flow again. At times the ideas effortlessly flow and when they don't it is less then pleasant!

I did try to do a bit of sculpting again to see what would happen, well I am not sure I like what came about, so the piece sits and waits. Does your mood come off onto your work? I think it does. I started another pattern, thought I had an idea for it but halfway through I have no idea how to finish it. So hopefully soon I can be productive again! I am not finished by any means, just taking a forced break!

This is a time for reflecting, doing things I don't always allow myself to do. Usually when I cannot produce I feel so guilty like I am letting my customers down, I will have to let that go and hope they will be there when I am back. I do think we are our own worst enemies, we are so hard on ourselves when in reality no one else really is!

What else have I been doing, well I have enjoyed Mother's day visiting with family, took a mini trip, puttered around with the hubby, going for long walks etc... :-)

I did update my Etsy and Website with a few new supply items I will share here. The first are Solar Mason Jar Lids!


These lids are wonderful! they fit on any standard sized mason jars and have rechargeable batteries that re-charge with the sun. There are so many fun things to do with lit jars! I will post pics. when I do some of them up. Some of them are: Garden lights, kids nightlights, snowman scent, holiday scenes etc...

Next up is the addition of another color added to my LED grungy taper collection. Black is the color, I wasn't too sure about ordering this but absolutely LOVE the look of them and see I should have had them from the get go. I know offer 5 wonderful colors! They are timered which means they go on for  6 hours and off for 18. LOVE THESE!


I now offer both crows and star tissue paper packets. 


I also added this adorable Rusty Fat Kettle, this has such a nice rustic pioneer kitchen look to it! This can be used for an arrangement, pillar candle holder, or put anything you can think of in it. I love how well these container take paint if any of you are interested in that part of it. 


This rusty pan is such an adorable size, 1.5 high by 6" diameter! This would make a neat votive or tea light pan, candy dish, potpourri dish or a base for a hand made pin cushion!


I am starting out with small quantities of new items to see first if they will be received well, then will order larger amounts if they do. 

I have posted so little that I am not even sure anyone reads my blog anymore, if you do check in well thank you! 

Have a happy day!

Sunday, March 30, 2014

Feedsack Pillow Tutorial

Well it's been a long time since I posted a tutorial so I thought I'd do one on these fun and easy feedsack pillows. The feedsack file can be found at www.ewenmeprintables.com, once the file is purchased you can print them on the fabric of your choice. Keep in mind that in order to actually sell your creations made with these feedsack images you will need to purchase the commercial license she offers.

 If you do not want to make the pillows yourself you may purchase them from me. I may soon offer these pillows un-stuffed, you do the stuffing, add any painting or embellishments like I show here yourself. These un-stuffed pillows will of course be reduced in price.

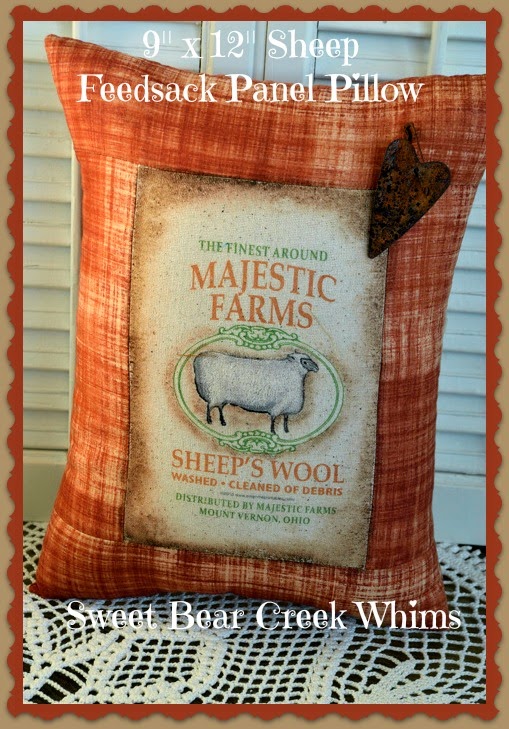
Okay.... so first is the picture of what I am talking about. Each pillow is 9" x 12".


If you want to make your pillow like mine you will need a feedsack panel of choice, either homespun or calico fabric that matches as well as acrylic paints, textile medium, large and medium flat paint or fabric brush, stuffing, sew machine, waterproof pen and rusty embellishments. 

I do not have photos of how to print on fabric but will give a quick overview here. I do believe there are instructions on this with the purchased feedsack file. I print my panels on osnaburg. I buy freezer paper already the size of printer paper but you can cut freezer paper off the roll to do the same thing. Lay the shiny side of the freezer paper down onto the wrong side of your fabric. I cut my fabric out a bit bigger than the actual paper at this point. Use a hot dry iron to stick the paper onto the fabric. I use my straight edge to cut away any excess fabric. You want this to be the exact size of printer paper. You will be running this through your printer just like you would paper. Play with your printer settings. Pigment inks are the best since they are permanent and do not run when exposed to moisture. My Epson printer luckily has this. If yours does not just be careful with too much spot cleaning. Print out your panels and cut the panels to the size you prefer. I printed two images and cut straight down the middle and left it the size they came out. Disclaimer: I am not saying that every printer will do this, most will but cheaper/older printers can have problems with fabric. I cannot be responsible for any damage to your printer, you do this at your own risk.


I have chosen this panel to go with this rustic looking calico fabric. 


I am needing to iron out some of the wrinkles!


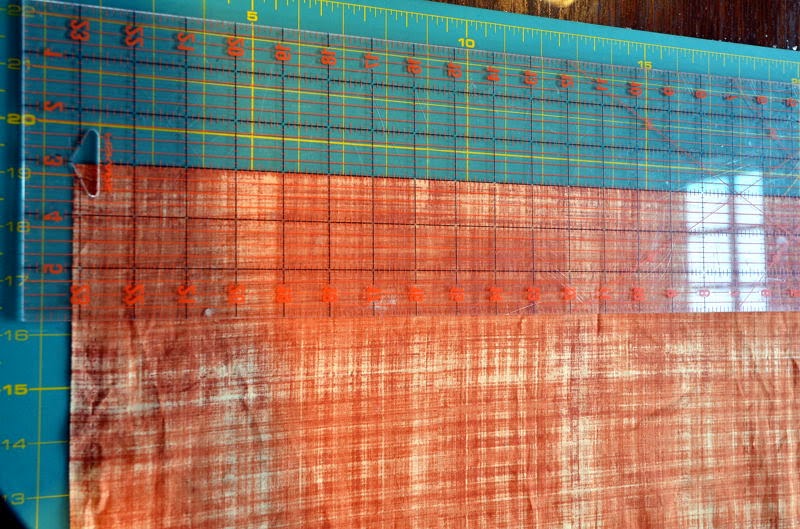
My craft room would not be without a cutting mat, a straight edge and a rotary cutter. This is great for accuracy. I am going to start by making sure I have a nice clean straight edge to my folded fabric. Lay the straight edge over it and measure over 1/2" or so and cut this ratty edge off your fabric.


See the difference, a very nice edge!


Now I lay my straight edge over this newly cut edge and lay it over 3". Use your rotary cutter to cut a 3" strip. You will only need one strip the length of the fabric for each pillow. A side note here: If you want to cut your feedsack panels smaller than I did, or simply want to end up with a pillow smaller with less contrast fabric showing, then cut your strips 2 - 2 1/2" instead of 3".

Here is my 3" strip all ready to go. Hmmm I am thinking I must have ironed this more, it looks pretty wrinkled!


Nice even cuts of fabric make this so nice to put together! Lay the strip down right sides together with one long edge of your feedsack panel. Pin this down. 


Turn all this so the back side is now facing up. Lay your straight edge over the edge so you can cleanly cut away the excess fabric.


Now when I flip this right side up you see this is ready to have the first fabric piece sewn on.


Sew down this edge using 1/4" seams. Trim this seam to 1/8".


Open up the fabric and iron it . 


Repeat the steps take for the first long edge and do the exact same thing to the other side.


Turn over the pinned piece and cut off the excess. Turn over and sew using 1/4" seams. Trim seam.


Open up and iron the second side down. If your edges are not exactly straight at this point you can even them up with the straight edge and rotary cutter. 


Now we will be doing the same procedure to the top and bottom as we did for the sides. Yes we are still working on the same 3" strip, there will be plenty. Pin right sides together, turn over and cut off excess fabric.


Always use your straight edge for this instead of scissors, this ensures your cuts are straight!


Sew along edge with 1/4" seams, trim open up then iron. Repeat this for the other edge.


This is what you'll end up with for the top. Now we are ready to sew this piece to the back side. 


Lay the top piece right sides together with the larger piece of fabric. Why am I not just measuring the top and cutting a piece? I feel that by cutting the larger piece to fit the top ends up being more accurate. You certainly can do what works for you here however.


Cut away so the back piece is larger than the top at this point, not need to be neat yet. 


Pin the top to the back more in the middle to hold in place, this will assure that the pins won't get in the way of the straight edge. I use a smaller straight edge for this since it is easier to maneuver. Lay the edge exactly next to the top piece and cut away the excess fabric. Repeat this for all edges so you end up with the back side and top exactly the same size and ready for sewing.


On the bottom edge I took some white chalk and made the lines so there was 4" between the lines. You will not sew this area but leave it open for turning and stuffing.


Sew around the entire pillow using 1/4" seams making sure to leave the bottom open for turning! Back stitch where you stop so the seams stay in place while you stuff. I do not trim these outer seams at all.


Turn right side out. You are now ready to start stuffing your pillow. 


I do think that stuffing quality matters here. I use Airtex Premium for all my stuffing, it is wonderful stuff! Stuff your pillow pretty firmly, you don't want to end up with a wimpy looking pillow. Take your time and use smaller chunks of stuffing if you want to avoid lumps.


This pillow is stuffed and ready to have the opening whip stitched closed.


NOTE: If your panel is printed with regular printer ink this next step may make the inks run. Something to try would be spraying the printed panel with a sealer and let dry. I like to add a bit of depth to my pillows by adding some shading with acrylic paints. I mostly use Burnt umber for this but if your fabric has more orange you can add some burnt orange or burnt sienna to your puddle of burnt umber. To make this you can add some textile medium right to the paint or add it to the water you will be dampening the fabric down with before you paint.


I use foam disposable plates as my paint pallets. Here I have my paint and textile medium ready.


First step is to dampen thoroughly any areas you want to add some color. I really make my fabric wet! If you have already added textile medium to your paint you can use straight water or add textile medium 70% to 30% water for this. If you are not sure your printer ink is water soluble then you may want to carefully wet the fabric making sure not to get the printing too wet! 


I am using a white fabric brush but a regular flat will work too. I use a wetter brush than normal when shading these pillows so the color stays soft on the fabric. Side load a very wet brush in your shading color. 


work this back and forth on a plate so the paint works into the wet brush being more color on the edge and softer toward the middle.

When my brush and the paint coming off of it looks about like this I am ready to paint. Remember you will have to repeat this step as your brush runs out of paint and keep doing this until your pillow is done.


Find a place to start and simply brush the shading in. ONe swipe will not do it, go over an area pulling the paint out as far as you want it. Using a pitty pat motion also helps. Make the paint do what you want it to, you are the master. If the paint is hanging up the fabric and or brush is not wet enough, add more water. As you can see one swipe shows a line, so I went over this area more times laying the brush down more toward the middle each time to help pull more paint toward the center. Practice the feel of this on a scrap piece of fabric. 


This shows the shading around the entire inside edge of the feedsack panel. I do think I will add more around the sheep and green design.


Now that looks better!


Here is my bunny pillow, I am using a smaller brush to add the shading around the center design. 

 Once your pillow is dry you may want to use a micron or faber-Castell PITT pen to add line work. These pens are permanent and waterproof. This is fun to do if you want to make features or details on the animals stand out. I did this on the sheep and bunny!


I really prefer these Faber-Castell pens, they really are nice. You can see that I outlined the bunny a bit with this pen. See the sheep below and you can tell where I added some line work.


Here is the glue I use for almost everything! This fabric glue is wonderful and you can permanently add whatever embellishments you want to your pillows with it. I have this cinnamon heart and bow ready to be added to my pillow. Use your imagination here, use old buttons, trims or rusty bells hearts etc... See the pics for the examples. 

All done!!! I Hope you enjoyed this tutorial.

LinkWithin

Related Posts Plugin for WordPress, Blogger...