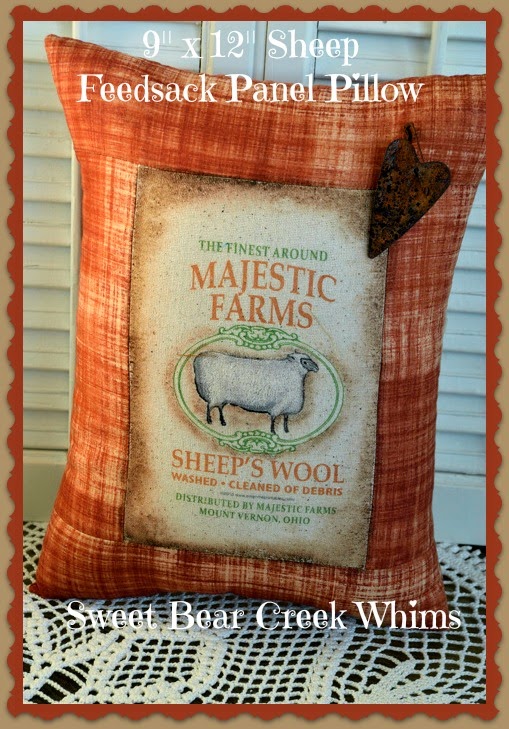
If you do not want to make the pillows yourself you may purchase them from me. I may soon offer these pillows un-stuffed, you do the stuffing, add any painting or embellishments like I show here yourself. These un-stuffed pillows will of course be reduced in price.
Okay.... so first is the picture of what I am talking about. Each pillow is 9" x 12".
If you want to make your pillow like mine you will need a feedsack panel of choice, either homespun or calico fabric that matches as well as acrylic paints, textile medium, large and medium flat paint or fabric brush, stuffing, sew machine, waterproof pen and rusty embellishments.
I do not have photos of how to print on fabric but will give a quick overview here. I do believe there are instructions on this with the purchased feedsack file. I print my panels on osnaburg. I buy freezer paper already the size of printer paper but you can cut freezer paper off the roll to do the same thing. Lay the shiny side of the freezer paper down onto the wrong side of your fabric. I cut my fabric out a bit bigger than the actual paper at this point. Use a hot dry iron to stick the paper onto the fabric. I use my straight edge to cut away any excess fabric. You want this to be the exact size of printer paper. You will be running this through your printer just like you would paper. Play with your printer settings. Pigment inks are the best since they are permanent and do not run when exposed to moisture. My Epson printer luckily has this. If yours does not just be careful with too much spot cleaning. Print out your panels and cut the panels to the size you prefer. I printed two images and cut straight down the middle and left it the size they came out. Disclaimer: I am not saying that every printer will do this, most will but cheaper/older printers can have problems with fabric. I cannot be responsible for any damage to your printer, you do this at your own risk.
I have chosen this panel to go with this rustic looking calico fabric.
I am needing to iron out some of the wrinkles!
My craft room would not be without a cutting mat, a straight edge and a rotary cutter. This is great for accuracy. I am going to start by making sure I have a nice clean straight edge to my folded fabric. Lay the straight edge over it and measure over 1/2" or so and cut this ratty edge off your fabric.
See the difference, a very nice edge!
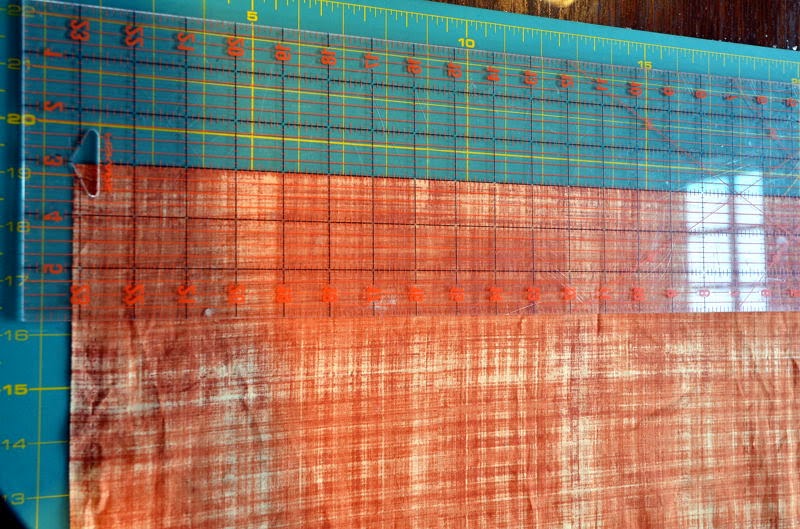
Now I lay my straight edge over this newly cut edge and lay it over 3". Use your rotary cutter to cut a 3" strip. You will only need one strip the length of the fabric for each pillow. A side note here: If you want to cut your feedsack panels smaller than I did, or simply want to end up with a pillow smaller with less contrast fabric showing, then cut your strips 2 - 2 1/2" instead of 3".
Here is my 3" strip all ready to go. Hmmm I am thinking I must have ironed this more, it looks pretty wrinkled!
Nice even cuts of fabric make this so nice to put together! Lay the strip down right sides together with one long edge of your feedsack panel. Pin this down.
Turn all this so the back side is now facing up. Lay your straight edge over the edge so you can cleanly cut away the excess fabric.
Now when I flip this right side up you see this is ready to have the first fabric piece sewn on.
Sew down this edge using 1/4" seams. Trim this seam to 1/8".
Open up the fabric and iron it .
Repeat the steps take for the first long edge and do the exact same thing to the other side.
Turn over the pinned piece and cut off the excess. Turn over and sew using 1/4" seams. Trim seam.
Open up and iron the second side down. If your edges are not exactly straight at this point you can even them up with the straight edge and rotary cutter.
Now we will be doing the same procedure to the top and bottom as we did for the sides. Yes we are still working on the same 3" strip, there will be plenty. Pin right sides together, turn over and cut off excess fabric.
Always use your straight edge for this instead of scissors, this ensures your cuts are straight!
Sew along edge with 1/4" seams, trim open up then iron. Repeat this for the other edge.
This is what you'll end up with for the top. Now we are ready to sew this piece to the back side.
Lay the top piece right sides together with the larger piece of fabric. Why am I not just measuring the top and cutting a piece? I feel that by cutting the larger piece to fit the top ends up being more accurate. You certainly can do what works for you here however.
Cut away so the back piece is larger than the top at this point, not need to be neat yet.
Pin the top to the back more in the middle to hold in place, this will assure that the pins won't get in the way of the straight edge. I use a smaller straight edge for this since it is easier to maneuver. Lay the edge exactly next to the top piece and cut away the excess fabric. Repeat this for all edges so you end up with the back side and top exactly the same size and ready for sewing.
On the bottom edge I took some white chalk and made the lines so there was 4" between the lines. You will not sew this area but leave it open for turning and stuffing.
Sew around the entire pillow using 1/4" seams making sure to leave the bottom open for turning! Back stitch where you stop so the seams stay in place while you stuff. I do not trim these outer seams at all.
Turn right side out. You are now ready to start stuffing your pillow.
I do think that stuffing quality matters here. I use Airtex Premium for all my stuffing, it is wonderful stuff! Stuff your pillow pretty firmly, you don't want to end up with a wimpy looking pillow. Take your time and use smaller chunks of stuffing if you want to avoid lumps.
This pillow is stuffed and ready to have the opening whip stitched closed.
NOTE: If your panel is printed with regular printer ink this next step may make the inks run. Something to try would be spraying the printed panel with a sealer and let dry. I like to add a bit of depth to my pillows by adding some shading with acrylic paints. I mostly use Burnt umber for this but if your fabric has more orange you can add some burnt orange or burnt sienna to your puddle of burnt umber. To make this you can add some textile medium right to the paint or add it to the water you will be dampening the fabric down with before you paint.
I use foam disposable plates as my paint pallets. Here I have my paint and textile medium ready.
First step is to dampen thoroughly any areas you want to add some color. I really make my fabric wet! If you have already added textile medium to your paint you can use straight water or add textile medium 70% to 30% water for this. If you are not sure your printer ink is water soluble then you may want to carefully wet the fabric making sure not to get the printing too wet!
I am using a white fabric brush but a regular flat will work too. I use a wetter brush than normal when shading these pillows so the color stays soft on the fabric. Side load a very wet brush in your shading color.
work this back and forth on a plate so the paint works into the wet brush being more color on the edge and softer toward the middle.
When my brush and the paint coming off of it looks about like this I am ready to paint. Remember you will have to repeat this step as your brush runs out of paint and keep doing this until your pillow is done.
Find a place to start and simply brush the shading in. ONe swipe will not do it, go over an area pulling the paint out as far as you want it. Using a pitty pat motion also helps. Make the paint do what you want it to, you are the master. If the paint is hanging up the fabric and or brush is not wet enough, add more water. As you can see one swipe shows a line, so I went over this area more times laying the brush down more toward the middle each time to help pull more paint toward the center. Practice the feel of this on a scrap piece of fabric.
This shows the shading around the entire inside edge of the feedsack panel. I do think I will add more around the sheep and green design.
Now that looks better!
Here is my bunny pillow, I am using a smaller brush to add the shading around the center design.
Once your pillow is dry you may want to use a micron or faber-Castell PITT pen to add line work. These pens are permanent and waterproof. This is fun to do if you want to make features or details on the animals stand out. I did this on the sheep and bunny!
I really prefer these Faber-Castell pens, they really are nice. You can see that I outlined the bunny a bit with this pen. See the sheep below and you can tell where I added some line work.
Here is the glue I use for almost everything! This fabric glue is wonderful and you can permanently add whatever embellishments you want to your pillows with it. I have this cinnamon heart and bow ready to be added to my pillow. Use your imagination here, use old buttons, trims or rusty bells hearts etc... See the pics for the examples.
All done!!! I Hope you enjoyed this tutorial.


Wonderful Tut, Jody! Wow...I have never seen such a GREAT how- to for pillows including step by step pictures and the extra adorable finishing touches. Thanks for sharing this!
ReplyDeleteHugs!
I have made a lot of pillows using these feedback panels, but never thought to paint any! Thank you so much for posting the tute! Your pillows are so nice, I hope mine turn out as pretty as yours.
ReplyDeleteWanda
These are so cute, Jody! Thanks for "sharing" your little feedsack tutorial with all of us!
ReplyDeleteGreat tutorial! I love these pillows and the way you have designed them! Keep up the great work!! Thanks for sharing :)
ReplyDeleteSweet tutorial! I love what you've done with these. They look great!
ReplyDelete