Any and all content of this site or any site owned by me, (Jody Wakefield) that is shared via the Web, Facebook, Twitter, or Pinterest must be accompanied by a link to the original site from which it was shared.


Tuesday, April 23, 2013

Raggedy Annie ~ Face Painting Tutorial

 
I am just finishing up my next pattern, a sweet Americana Raggedy Ann. I painted her face today and took photos for a quick tutorial. I hope you enjoy it!

Her pattern will be available within a weeks time. I still have to come up with something patriotic for her to hold. She still does not have a proper name if anyone wants to help me come up with an idea!

I will show her finished in these first photos then we will re-wind and start her painting process!

 
Here is a full body shot, although this picture doesn't really show her cute socks and shoes! Her flag body, arms, shoes, socks and face are all hand painted. Her arms are wired so she is able to put her right hand over her heart for a flag salute!
 
Now let's start from the beginning with her blank face and see how she comes alive!
 
 
I drew the eyes I wanted onto cardstock and cut them out. I pinned them where I thought they looked good and then double checked my placement with a caliper. I used a mechanical pencil to trace around the eyes. I just free handed the nose and mouth. This will be the face you will get in this dolls pattern. As you can see this doll will have eyelids. The black will only be painted in the lower portion.
When painting on fabric a mix of textile medium and water is used to keep the paint from bleeding into the fabric. I dressed a round brush in black and textile mix and painted the eyes in black. Let this dry or speed dry with a heat gun. Be careful to stay far enough away from your fabric with the heat gun or you may burn your project!
Here is the round brush I used. I have one puddle of textile mix and one of black on a foam plate.
The next step will be to highlight the eyes to bring life into them. Now that you are painting over the black paint you will not need textile medium. Dress your brush in water and blot off the excess lightly on a paper towel leaving some water in the brush. Dip one corner of the brush in white and go back and forth on the plate until the color goes from darker to lighter ending in the middle of your brush.This is called side loading for a float of color. Float white in each lower eye.
Here you see that I have added a float of white keeping it darker toward the bottom until it ends in the middle. I also took a liner brush and thinned down black (thinned in textile medium) and lined eyes to define the eyelids.
Next I took my liner brush and added white highlight dots and some reflection lines in each eye.
 
Next I will do some shading around the eyes, this is one of the most important parts in making her features pop. I have a puddle of textile medium water mix, burnt umber and my flat brush to do the job.
This picture shows how much I dampened the area around her eyes for shading. I did the entire area so there would be no lines on the fabric once dried. While it is wet I will add my float of color.
 
Just like with the white I dip the corner of a slightly damp brush in burnt umber and go back and forth so the paint loads the brush from dark to light in the middle. As you can see here when I started it the color was dark but as I moved around on the plate it became lighter. I liked how it was coming off the brush (see strokes directly above brush) when it was nice and soft. Now I am ready to add this around the eyes. Note: I have to do this procedure for each eye and sometimes twice for each eye to make it around with my color.
 
Here are the eyes after I added shading around them. I left the lower edges clear of color. This needs to be dried a bit with the heat gun so I can move on.
 
This is the inexpensive heat gun I use for speed drying. These guns are normally used for embossing and can be found in the scrapbooking section of your local craft stores.
 
On go the eyebrows, but I have to make sure they are not lopsided so I measure the distance from the top of the eye on the first one and make sure the second one falls within the same distance.
 
I am dampening the nose with textile medium mix so the paint will flow smoothly. I also did this to the eye area before I added the black to make the paint move nicer. She is ready for a nose
The nose and mouth are filled in, from here I will add some floats of burnt umber to add a bit of an antique look to the nose and mouth.
Now that the area around the eyes are dry, I added some whispy eyelashes. Notice how the shading really makes the eyelids pop out.
 
Shading has been added above the nose.
I used this liner brush and added the mouth lines and outlined the nose. Now her face is starting to come to life.
Now that the mouth is done I added a bit of shadows below the mouth and the cheek indents. It just needs to dry so she doesn't look so funny! Hmmm how about some lower lashes?
 
I added some floats of white in the nose and mouth. Three lower lashes where put under each eye with a liner brush and black. She now needs a little color so she doesn't look so anemic....:-)
 
 
The cheeks are done with a cheek color, textile mix and Donna Dewberry's medium scruffy brush shown here. The first step will be to dampen the entire cheek area thoroughly first.
 
 
Dip a dry brush into your paint and swirl it into the brush using the foam plate. From here you will want to swirl most of the paint out of the brush onto a dry paper towel until only a light amount is coming off the brush.
 
This shows how much was coming of the brush when I started and how it looks when it is ready to go, nice and light. From here I lightly added the cheek color in a circular motion until the cheeks where the depth I liked. Let this dry and you should have this.....
 
Look at that sweet little raggedy girl! This was so much fun... I have a love for raggedy ann dolls that started when I was a child. I still have my magical raggedy ann from way back when. She got up every night and played about while I slept, she came alive! I do think this gal needs some hair to go along with that whimsical face!
 
 
I will end with the same picture I started with. I do hope you give painting on fabric a try, it opens up a whole new world of possibilities to you creatively. For me there would be no dolls without paints and brushes.
 
Thanks for stopping by
 

Friday, April 12, 2013

Snowman Pattern Available

I want to let you all know that I just finished up this sweet snowman and his pattern is available. He is now for sale on Patternmart, Etsy or my website! He would also look pretty cute done up in the traditional Christmas colors. My friend LeeAnn helped me with his new name (Candee Cornflake!) isn't that too sweet?

 
What a great feeling when I finally do finish up a pattern! I am always happy to have a fresh start on be thinking of my next one. The wheels are spinning but not sure what direction they are going just yet. I will let you know!

Sunday, April 7, 2013

Primitive Snowman ~ Fall Into Winter

It occurred to me today as I was in the middle of total craft room chaos... that I am most happy while creating. Everyone has that (something) that while they are doing it, there is no where else you'd rather be right? The feeling for me as I am engrossed in creating is one of joy, a full heart, gratefulness. There is no concept of time flying by while sitting amongst piles of fabric, pins, glue, paint and glitter! I cannot even explain what simply walking into my studio and breathing in the smell of it does to me, the sights of supplies, fabrics and this n thats are instantly calming. I had to stop and thank God today for the gift of creativity, because I cannot imagine my life without it. These things we can do, the things that fill our hearts with unspeakable joy are not of our own doing, but gifts given to us.... I am so thankful! There are those of you out there that know exactly what I am talking about, there is that (thing) we know that others dont!

Now onto what I was doing today in that room that made me so happy! I will show you the picture first and then explain how he came to be..... I call this project (Fall Into Winter) Yes, this is my next pattern!! Be on the lookout for it soon. I still have to do the writing of this pattern, this is very time consuming. I am only guessing that it may be done within a week, it depends on how busy with other things my week gets.


Who says that snowmen don't enjoy Fall? This little guy certainly does!! He enjoys celebrating Fall while waiting for Winter to arrive. I am not sure what his name is yet, any suggestions?
 
Why a snowman now? I told myself that this year I would create what I was in the mood to do regardless of what season was coming up. I also had just finished a snowman for Prims 2013 Fall/Winter issue so I was already in the snoman making mood. This started out as your typical snowman, he was going to be Christmas all the way... well about halfway done I spotted this large black sock in my basket. On a whim I took it out and thought... HMMMM I wonder if this sock will stretch over this guy for a sweater! Well guess what? it worked like a charm. This completely accidental finding changed the entire project. In that moment I could see this snowman dressed up in Fall clothing. One thing led to another and he HAD to have candy corn buttons, a pumpkin and polka dot hat and striped shoes. This ended up being such a fun project. This is another example of how my things end up determining what they'd like to be even though I had something else in mind!
 
My Henrietta Hen has this roly poly body, I really love how nicely this design sits. SOOOOO I am going to do a pattern series over time that incorporates this darling sitting body and round head. This is pattern 2 in the series. Other things I may have in mind are a bunny, bumble bee, gingerbread, lady bug, pumpkin, cat and who knows what else. I will change up the legs, arms, size and whatever else needs to be added for each project! I am not saying they will be created one after another, after all you all know by now that I am not the fastest at putting these out. I will do them as I am in the mood,
probably in between other patterns that are not going to be in this series.
 
 Here is a side view that shows the roundness of his body. I used a twisty pod for the nose on this guy.
 
I do hope you are all having a nice Sunday!

Wednesday, April 3, 2013

Polymer Clay Candy Making Tutorial

Hello Friends!

I am excited to share with you a wonderful tutorial my friend LeeAnn of Charmed Confections just posted on her blog! She shares in detail how she makes her real looking candies. They do look good enough to eat! This is such a fun thing to do and there are endless ways you could use these candies with your hand made projects! Please stop by her blog and enjoy learning how she does this. She has included lots of photos as well. Click on the picture below to go to her blog! She would love to hear your comments!

 
What have I been doing? Well I think I must have Spring fever because I cannot concentrate at all right now on creating. I have been doing things outside and doing things with the hubby. We are also getting ready to have a Spring garage sale! No worries though, this too shall pass and I will be back to creating those patterns!
 
Thanks for stopping by....:-)

Friday, March 22, 2013

Snowman Doll Finished

Good afternoon!

I see that I have really been MIA, wow it's been way too long since I have posted. I guess it is just that time of year, not too much going on. Spring is spitting and sputtering it's way here, two steps forward and two back it seams. Right now the temps are low but the snow is gone at least for now.

I wanted to share what I have been up to. I was all set to get going on another pattern, was thinking Spring but..... I was side tracked. I had just put away all my winter snowmen, but needed to start thinking (snowman) once again! Why?? well I was asked to make a snowman for the Autumn/Winter 2013 Prims Publication! Okay, I would have been nuts to turn that invitation down so I got my mind wrapped around winter once again. These submissions need to be in way before the magazines ever come out, so typically these things are made in a completely different season.

I got my thinking cap on and worked on coming up with something unique, not your everyday snowman variety. I am pleased with what I ended up with and will share her here! I have just sent her picture off so I still need to get the final okay if she is accepted, so we are crossing our fingers here.

What emerged was a very child-like snow child. Her head and wrapped candy are paperclay, her body is cloth with painted gloves and feet. Her sucker is baked polymer clay.
 
 
This picture shows how roly poly her body is, she does sit nicely though....
 
Here is a side profile of her sweet face. Honestly I cannot explain this, when I sculpt these faces I really do not have them planned out first, they just happen....they become what they want to be. Oh that is not to say that I don't attempt to plan them out, but that rarely works!
 
What is funny to me is that I swear I have seen this face, or it reminds me of someone I have met, know or otherwise. I cannot put my finger on it, but it makes me smile! I am not saying I actually know anyone human with a snowman nose, but there is a resemblance in the look this doll has.
 
 
Here is a close up of her little wrapped snowmint candy. Hmmm do you think this little guy is not happy anticipating being eaten by this snow child? She has herself a sweet tooth! LOL
 
This is her sucker, it was made from baked polymer clay and finished off with fine glass glitter.
 
I am thinking I may make this doll into a snowman pattern but offer a fabric head instead. The clay head is sculpted onto a foam ball and is basically added to the body just like a round fabric head would be. I am still thinking about this......
 
Thanks for stopping by and taking a peek at my latest creation!
Saturday, March 9, 2013

Primitive Sheep and bunny pinkeep!

Good morning! Wow you should see the lovely day I can see out my window, the yard is glistening like diamonds since it is still freezing. The skies clear and blue and the sun is shining brightly, how very nice!!

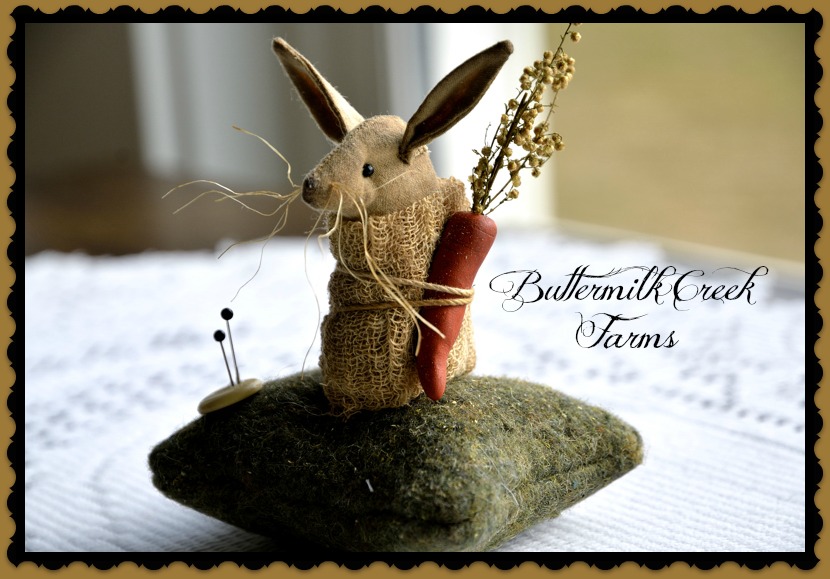
I have some show and tell! If you are like me I have collected so many things over the years that if and when I buy something it has to be over the top. I look around my house and know I need to start paring down and not adding to it. However lately I could not help myself and bought two of Carol from Buttermilk Creek Farms hand made goodies! One is an adorable pin keep that she used wool and crushed walnuts to fill it. The other is a sheep that is pulling a cart, now who could resist that? I do believe she needle felted the wool on and made that cart herself! If a sheep is what you are after Carols really are the best there is! Check her blog out www.buttermilkcreekfarms.blogspot.com


I also wanted to share my latest craft room tool discovery!! I have always used those purple disappearing markers, they would run out quick or disappear too quick. Not to mention they didn't always show up well. I need a good way to trace my pattern pieces for sewing. I was talked into buying these pilot pens, wow I love them!!! They are nice and bright, stay on till your done and either erase off or hit is once with an iron and the marks are gone. They have them in every color. I am showing blue and red here but trust me I'll be getting every color the fabric store has. No more purple pen for me. The brand I have is Frixion and they are SWEET.
 
 
In other news, I have had my brother here for a family visit, that was so nice! I do not live close to my immediate family anymore so these times are treasured for me.
 
I also was asked to come up with a snowman for the Prim's winter/Fall issue this year! I have until April 15th to come up with something. My head has cobwebs in it right at the moment so I am not sure what I'll do but I hope I get an idea in  a hurry. I am so excited to be a part of two publications this year, I am surely pinching myself! This will slow down the pattern production a bit until I can get this piece done, but no worries there will be more in the near future!
 
I will have two hens for sale, one on PFATT this month and the other I will post any day now on Prim Nest. The second hen will come with a nest but I just did not have time to make her a bukcet of eggs.
 
Have a blessed Saturday!

Friday, March 1, 2013

Folk Art And Primitives Blog Giveaway!

 
Click on the picture to go to the team blog page. You won't want to miss out on this fabulous givaway! To see the rules and sign up for this giveaway visit the FAAP blog. There will be 4 winners in all! Just look at all those prizes....

Sunday, February 24, 2013

Henrietta Hen Part 5

Hello! this is the last tutorial for this hen, I hope you have enjoyed watching her come to life. Her pattern is now available as well! I am definitely ready to start on another project.

NOTE: I added more descriptive photos of the wire feet being made. This was added to part 1 if you want to go back and check that out.


I am going to prepare the feathers. I always have my coffee mixture made up and ready to use. The feathers I have used are the boas you buy in the craft store. Of course this stark white will not cut it, this is a prim hen after all. lay the feathers on a foam plate and saturate them with coffee, use your brush to get the coffee everywhere.

Here are the feathers all wet and looking pretty bad. Let them dry and fluff them a bit with your fingers as they dry.

I have glued the feathers on the neck and one leg in this picture, I love how this looks. You can see the comparison of how plain the other leg looks without them. I used fabri-tac glue here and held the feathers in place with straight pins until dry then pulled them out.

Adding little bits of feathers randomly around the comb adds even more whimsy. I finished her off by adding small strips of feathers on top of each wing. Does she look a bit put out and bored here? She is so done already with me messing with her!! LOL

She needs some eggs for her bucket. I covered small foam balls with clay, shaped them and let them dry. Once dry they are sanded, sealed and painted with acrylics.

Here are my painted eggs. I mixed them up by making some darker and some lighter. I speckled the eggs in the same way I did the chicken. 

I am checking to see if this is the look I am after, I do like it! I glue each egg in place. The eggs are sitting on top of foam that is topped with moss. Next I will make the sign.

for the sign I am using a thin wood tag from the craft store. I simply cut off the end with the hole. I then took a candy apple stick and glued it to the back. After it is dry it will need to be sanded.

I painted the sign in the same red I used for the hen's comb. Darker colors take 3 or so coats for good coverage.

To make the sign more interesting I added a float of burnt umber around the outside edges of this sign. I also printed the words on some card stock and cut it out a bit smaller than the sign. Next I will age the card stock with vintage photo distressing ink and a make up sponge.


Lay the sign on some paper so your table won't get inked. sponge the outside edges like you see here. I use a swirling motion. Just practice a bit on a scrap piece of paper to get the feel of it.

Next you are going to mod podge the card stock onto your painted sign. I wanted to show you the nifty container I found at hobby lobby. There are times when I need thinned down mod podge, I like to use a container like this with pre-mixed mod podge. The hole is large which I love, I can just grab and use it. For this sign however you will use it straight from the bottle without thinning it.

Here is the wet sign, you can see the mod podge but don't worry it will disappear when it dries. I applied two coats. 

Here's the bucket all finished. I do think it is looking nicely prim. 

Well that's it! I do hope you have enjoyed these tutorials. My hope is that the visuals will be helpful to those building their own hen's. Happy Creating!!!

Friday, February 22, 2013

Henrietta Hen tutorial Part 4

Hello! well here we are on part 4 of this tutorial. I bet you wonder if this is ever going to end? The answer is yes but it is much longer than I thought it would be. There will be one more post after this.
 
 
Here you see that I have added a float of white in each eye walking it up futher into the eye. I also added some white highlight dots and a reflection line. 


She now has eyebrows, eyelashes and a float of burn umber around the upper eye area to make them pop. I added a float of white under each eye. I swirled on some cheek color with a dry brush like you see in the picture. She is relieved to have a face now!
 
 
I added a line of burnt umber with a liner brush between the feathers. I finished that off with a float of burnt umber as well.
 
 
I added some shading around the upper thigh where the leg meets the body. It isn't showing up too well I see in this picture.
 
 
I added a coating of antiquing gel to the feet and wiped it back lightly with a piece of t-shirt material.
 
 
Here is a picture of the antiquing gel I use, the sealer I spray the finished chicken with and the mod podge I use as a final cover to the wire chicken feet.
 
I decided at this point that I wanted to have a speckled chicken. This can be done with a spatter tool like you see in the picture or a toothbrush. The paint needs to be thinned down a bit with water first. With my tool I coat the brush in paint and there is a metal piece you don't see in the picture that when I twist the wood handle it goes against the bristles. Just use a knife of paint spatula like you see in the picture and a toothbrush if you do not own a tool like this one.
 
 
It appears that I have thrown this chicken in the garbage can...... well yes I have actually! I stuck her in there so when I speckle her all up the floor and me does not get speckled with her.
 
Can you see all her speckles? I did this with Burnt Umber. What would I do without that color? I am not sure....
 
Here is the sideview, you can see all her speckles a bit better in this picture. I know all these details are a lot of fussing, but it is this kind of attention to detail that really does make a difference in your finished artwork!
 
This is the end of Part 4. Part 5 will focus on finishing her up and making her bucket of eggs! I also took more photos while I made another pair of wire feet. This time I show the steps of bending the wire into the foot shape. I will add this onto the last tutorial.
 
Thanks for stopping by!

LinkWithin

Related Posts Plugin for WordPress, Blogger...